Sunday, December 30, 2012

Pic Monkey!

A lot of the photos that I have posted on my blog (excluding the ones that go along with recipes I found on the internet that have sources underneath) were edited with PicMonkey, an online photo editor. Using PicMonkey is extremely easy, and it's free! You don't even need to create an account. All you do is upload a photo, edit it, and save the finished product to your computer. However, registration is required if you sign up for PicMonkey Royale, which cost $4.99 per month and gives users even more options. I use the free version, and here are some of its features:

Features of PicMonkey (Free Version)
-  Basic editing options (cropping, rotating, sharpen, resize, etc.)
- Cool effects, such as...
- Touch Up Effects (Blemish Fix, Blush Boost, Teeth Whiten, Weight Loss, Lip Tint, and Red-eye Remover, etc.; Even more effects for Royale users like: Spray Tan, and Wrinkle Remover)
- The ability to add text, with several fonts (text was added to the images above)
- Fun Overlays (Comic Bubbles, Butterflies, and more)
- Photo Frames
- Textures
- Themes (Winterland, several Halloween themes)
- You can also create collages! The four pictures of Chelsea above were put together using the collage option. 

Next time you want to edit a photo, try PicMonkey! I highly recommend it!
Here's the link:


Tuesday, September 11, 2012

Ninja Frozen Treat & Drink Maker

In the post, "Fruit Smoothies", I mentioned that my entire family loves smoothies! We just git a new blender, Ninja Frozen Treat and Drink Maker, which was made especially for making milkshakes, smoothies, and other frozen treats. It works great! The blades are strong and chop quickly. Here's the recipe I tried when we first tested it out, which was just as great as the blender:


Picture of Caramelized Banana Shake Recipe

Photo: Carmalized Banana Shake Recipe


Ingredients

  • Nonstick cooking spray
  • 3 small or 2 large ripe bananas, halved lengthwise
  • 2 tablespoons sugar
  • 1 cup ice
  • 1 cup vanilla ice cream
  • 1 cup milk
  • 1 teaspoon vanilla extract
  • 1/2 teaspoon ground cinnamon, for garnishing

Directions

Preheat the oven to 400 degrees F.
Spray a baking sheet with cooking spray. Place the bananas on the sheet and sprinkle with the sugar. Bake the bananas until the sugar is caramelized, about 15 minutes. Let the bananas cool slightly.
Mix the ice, ice cream, milk, vanilla and bananas in a blender until smooth but still thick. Pour the shake into 4 chilled glasses and sprinkle with the cinnamon.


Source: http://www.foodnetwork.com/recipes/melissa-darabian/caramelized-banana-shake-recipe/index.html
Click the link above to learn more about the recipe. Click this link (http://www.ninjakitchen.com/index.shtml) to learn more about Ninja Kitchen Systems

Friday, August 10, 2012

Homemade Whipped Cream

Whenever we need whipped cream, my parents usually buy it from the store. However, I wanted to try and make the homemade kind today, just for fun (plus we had run out of whipped cream). I found a recipe online and tried it. It was actually really good! My sister and brother told me it tasted like ice cream :)
Here's the recipe:

Directions

  1. In a large bowl, whip cream until stiff peaks are just about to form. Beat in vanilla and sugar until peaks form. Make sure not to over-beat, cream will then become lumpy and butter-like.

Nutritional Information open nutritional information

Amount Per Serving  Calories: 54 | Total Fat: 5.5g | Cholesterol: 20mg


ENJOY!

Monday, August 6, 2012

Another Room Organization Idea: Craft Storage

                I was looking at the information on the traffic to my blog and was very suprised when I found out what my most popular blog post was. It wasn't about books, or products  I like, or even recipes! Those are the things that I blog about the most so I was shocked. The most popular blog post was "My Room" a post I wrote back in February. This post wasn't just the most viewed, it had won by a landslide. This convinced me that the public is really interested in room organization right now. So... here is another room organization idea!
       
I love making crafts, so one of the first things I did when I started organizing my room was organize my craft supplies. Here's what I did:

Supplies You'll Need:

  • A craft bin. I recommend getting one with wheels, like the one in the picture below. That way, you can easily move it around. 

I found this image at:  http://www.walmart.com/ip/Sterilite-3-Drawer-Medium-Cart-Arctic-White-Set-of-2/3385116


  • Labels. You can buy a pack of labels that you have to write on yourself, or you can use a label maker if you have one. 
  • A permanent marker. (If you're going to write on the labels yourself instead of printing them.)
  • 1-inch binders. (Optional.) I used 2 one-inch binders to store my drawings and stories in.
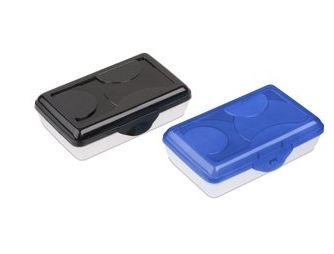
  • Crayon boxes. I used crayon boxes to separate my crayons, colored pencils, and markers. (Like the ones to the left; I found this image at:  http://www.walmart.com/ip/Sterilite-Pencil-Box/17355912
  • Page protectors. (Optional.) I used page protectors to protect my drawings before putting them into the binder.
 
  1. First, you need to decide what you're going to put in each drawer. I brought a craft bin with three drawers, but you can buy one that's any size you like. I decided to put construction paper, graph paper, sketch paper, and any other type of paper that I had in drawer 1. I put my drawings and stories in drawer 2. Drawer 3 is the biggest drawer, so I filled it with colored pencils, crayons, and  markers. 
  2. Before putting my drawings and stories into drawer 2, I separated them into two different binders. I put the drawings into page protectors before putting them into the binder. That way, I wouldn't have to punch holes into them. 
  3. I separated my markers, crayons, and colored pencils into three different crayon boxes and labeled each box before putting them into drawer 3. That way, they all have a specific box to go in when you're done using them.
  4. Label the drawers! I labeled drawer 1 "Construction Paper &  More", drawer 2 "Drawings & Stories", and drawer 3 "Crayons, Colored Pencils, & Markers". Stick the labels on and you're done!

Friday, July 27, 2012

Book Reccomendations

I love to read, and there are tons of great books out there. Today I would like to share with you some of my favorite books/series. Along with the titles, I have written the age range that www.barnesandnoble.com recommends.

- All of the Ramona books by Beverly Cleary (Ramona Quimby, Age 8; Ramona Forever; etc.) 
Age 9-11
- The Geronimo Stilton Series by Geronimo Stilton Age 7-10
- The Box Car Children Series by Gertrude Chandler Warner No age recommendation from Barnes and Noble, I recommend age 7-10
- All of Andrew Clements' school stories ( Extra Credit, Lost and Found, No Talking, Lunch Money, A School Story, The Report Card, Frindle, etc.) Age 8-12
- Nancy Drew Girl Detective Series by Carolyn Keene Age 9-12
- The 39 Clues Series & The 39 Clues: Cahills vs. Vespers (Series # 2) by Various Authors Age 9-12
- All of Rick Riordan's books Age 9-11
- Gordon Korman's Swindle Series (Swindle, Zoobreak, Framed, Showoff) Age 9-12


Sunday, July 1, 2012

My Kinect Review!

             Here is the review of Kinect I promised. The truth about Kinect is that it's... AWESOME! Kinect is entertaining for all age groups, as well as a good work out. My favorite game right now is Kinect Sports. I  also played a demo of Kinect Joy Ride. Kinect Joy Ride immediately impressed me when it asked me to hold an object up that was the color I wanted my race car painted. I held my pink retainer case in front of the camera. My race car on the game changed to the same shade of pink!
             Kinect has very impressive technology. I can search for movies, music, and even turn off the console with just the sound of my voice. Kinect also has face-recognition technology. Once you let a person go through the Kinect ID session, the camera will recognize them  ever time they play.

I have no complaints about Kinect or the Xbox. Overall, I give the gaming system 5 out of 5 stars!

Kinect Sports


Monday, June 11, 2012

Xbox Kinect

Okay....sorry I haven't posted anything lately, nothing new has happened. However, I am saving my money to buy the hottest thing in the video game world right now: Microsoft's Xbox Kinect. Kinect is an accessory to the Xbox console that allows you to play video games with just your body. That's right: Kinect doesn't require a controller. It has a motion sensor, as well as voice recognition. Once I get the Kinect I'll post a review for those who are interested. Until then, here's some information about Xbox Kinect.

- Games: Kinect has games for the entire family. Whether you want to challenge your friends to a dance competition (Just Dance 3), play sports with your older brother (Kinect Sports; Kinect Sports Season 2), or pet an adorable tiger cub (Kinectimals), Kinect has it all.
- You can watch Netflix, Hulu, and more on Kinect and control the TV using only your voice. No TV remote required when you want to stop, play, or rewind.
- Cost: Kinect by itself costs $149.99, A 4GB Xbox console with Kinect costs $299.99. A 250GB Xbox console with Kinect costs $399.99, and the Special Edition 4GB Xbox console with Kinect (Family Bundle) costs $299.99.


For more information on Xbox Kinect, please visit: http://www.xbox.com/en-US/Kinect?xr=shellnav